Setting up MongoDB in Docker on Synology NAS
First, you need to install Docker Container Manager, do this by searching for "docker" or "container manager in the Synology Package center.

Once that's installed, open it and click on "Registry", which will allow you to find Docker images.

An "image" is basically the recipe to create the Docker app, not the app itself. There are many different versions of mongo available. The process to use them all will be similar, but they may not be exactly the same. I'm using mongodb/mongodb-community-server.
Double click it, then choose the version you want, and click "Download". I'm using "latest" which is just whatever the last released version is, but there are other versions available, should you need them.

Click Container->create to start creating the new container.

Choose the image that you downloaded, give it a name. In this instance. my name is "new-mongo-instance", this name might be important to you later, if you need to do anything inside the container, so make it something that describes what this container actually is.
Optionally, you can choose to enable auto-restart, and set some resource limits on how much processor or ram it will use.

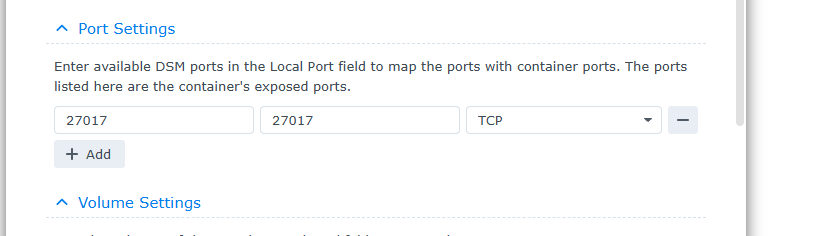
Next, you need to choose a port for the instance. It's a little confusing, but the container itself will expose 27017 to your operating system. You cannot change this port. Your NAS will expose another port. In most cases, you want the exposed port on your NAS to also be 27017, but there are reasons to use a different port. If you need to use a different port for your mongodb, this is where you'd do that. For my purpose, I'm using 27017.
Next, (optionally) you need to add 2 folders to the container. These folders are essentially links to the inside of the container, and allow some things that are actually inside of the container to be available from outside of the container. It also allows you a way to delete and restore this container without deleting the data. The docker image exposes 2 endpoints - /data/db and /data/configdb
/data/db is the place it will store your actual databases, and /data/configdb is for setting up replication and other advanced mongo operations. If you don't add these folders to your container, the app will still start and run fine, but nothing from inside the container will be accessible to the outside of the container, making it more difficult if you need to do things like update mongo, since you will have to export all of your data and re-import it to the new container. It's your option.

Next, you need to add the default Administration Credentials to your database. This is done through environmental variables. You might be able to skip this step, if you're restoring an already existing database by copying those files to the folder you mapped to /data/db in the previous step. Otherwise, you need to add 2 new variables to your environment:
MONGODB_INITDB_ROOT_USERNAME
MONGODB_INITDB_ROOT_PASSWORD
The username can be anything you want. I use something like mongoRoot
The password needs to be a strong one, if you don't want someone to be able to guess it and get access to your instance.
(note that these environment names appear cut off in the UI. The actual values are the values from above.

Finally, you can choose to change the network type, or add additional containers to link to.
In most cases, you're going to want a "bridge" network. Your NAS will expose the port you chose above and automatically forward any traffic you send to your NAS destined for that port to the container. Internally, the container will use the new IP assigned to it as noted in the UI. You won't likely use this, as you will use your NAS's IP to access your container.
The "Links" option, from what I understand, is deprecated, but still there in the Synology UI. According to my limited research, it set an Environment variable in the container that would allow "linked" containers to address each other with their container names.

Happy Coding!
~Tom

Comments
Post a Comment