My "GeekZebo", using Arduino(ish) to control neo-Pixel lights.


One of my favorite things to do in the summer is listen to music on my patio. We bought one of those "fancy" metal gazebos that they sell at the home improvement store and put it on our patio to save ourselves from the mosquitos that swarm Minnesota in the summertime, and to allow us to enjoy the outdoors even in some of the more inclement weather that shows up here from time-to-time. I noticed that there was a tiny "shelf" above the mosquito netting that looked like a great place to install strip lights, so I thought - why not geek up the place while I'm at it. So I installed some neo-Pixels.


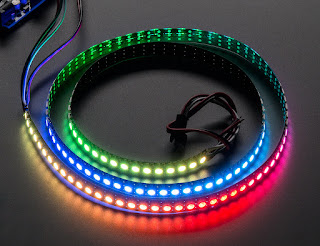
What are neo-Pixels?
If you're not familiar with neo-Pixels, at their core they're LED strip lights. What makes them extra cool is that they expose a way to address either a single LED (for most 5V systems) or a group of 3 LEDs (in a 12v system), and you can turn them on and off, or set them to any color you can think of. Once you set them, they stay that color until you change it or power them off. That means you can hook them up to something like an Arduino and make animations. There are several different part numbers for lights that you would describe as neo-Pixels, but I chose the WS2812, which is probably the most commonly available version.  

I'm also using an ESP8266 instead of an Arduino. You can use an "actual" Arduino for a project like this, but you'll be limited on how many lights you can control based on the Arduino you choose. The Uno can control a few hundred LEDs before you run out of memory. To control more than that, you have to switch to something like the Mega. The ESP8266 has more onboard memory than an Uno. I've had no issue using it with more than 700 neo-Pixels. Once you set up your IDE to use it, it's effectively the same as an Arduino but with more built-in capability such as WiFi. No matter which controller you choose, you'll have to read your documentation to figure out which pins to connect your strip to. The WS2812 has 3 lines  +5V, ground, and data.


Controlling the lights.
If you choose, you could read the documentation about your lights and control them yourself using i2c, but that's much more difficult than using a pre-made library. I'm using a library called FastLED, which basically extrapolates away all of the control of the individual lights, and gives you an array of LEDs to work with. 

#include "FastLED.h"

Once you include that (assuming you know how to add libraries to your Arduino IDE, that is. If you don't, and you'd like an article about it - leave me a comment and I'll write it.) You'll need a few more constants defined.

#define FASTLED_ESP8266_RAW_PIN_ORDER // for esp8266 version of FASTLED

#define NUM_LEDS 182 + 142 + 182 + 142 //184 + 145 + 184 + 145
#define LED_CONTROL_PIN 14             //D5 on the ESP8266

//#define CHIPSET NEOPIXEL // this is my other set of lights.
#define CHIPSET WS2812 // the lights in my gazebo are WS2812
#define BRIGHTNESS 100
#define COLOR_CORRECTION 0xFF4AF9
CRGB leds[NUM_LEDS];


 Then you initialize fast LED with your values:

 FastLED.addLeds<WS2812B, LED_CONTROL_PIN, GRB>(leds, NUM_LEDS); // these are my 5V lights

I now have an array of CRGB (which is defined in FastLED) with all of my LEDs. I can control any single one of them using led[index]

So you can do something like this, which would turn the first LED in the strip blue. The rest of the LEDs will remain unchanged, and this one will stay blue until you turn it off or change it. 

leds[0] = CRGB::Blue;
FastLED.show();

 
 This is all fine, but what makes it really cool is when you start doing animations in loops. 

Here's my code that will show a "1-dimensional" firework animation, which you'll see a slightly earlier version running in the embedded video above. 

#include "firework.h"
#define PRINT_DEBUG false
void firework::setLeds(CRGB *led)
{
    this->leds = led;
}
firework::firework()
{
    logD("initilize firework spark array");
    rand16seed = millis();
    this->numberOfSparks = random16(this->minNumberSparks, this->maxNumberSparks);
    this->mainColorHue = random(10, 255);
    this->currentBrightness = 100;
    // init the arrays.

    for (int i = 0; i < 647; i++)
    {
        this->sparkPosition[i] = 0;
        this->sparkColor[i] = 0;
        this->sparkVelocity[i] = 0;
    }
}
firework::~firework() {}

void firework::explodeStep()
{
    if (this->exploding)
    {
        return;
    }
    this->exploding = true;
    this->logD("explode step");

    for (int x = 0; x < random16(1, 20); x++)
    {
        rand16seed = (random16(1, 20));
    }
    this->logD("check alive");

    if (!isAlive())
    {
        this->logD("spark not alive");
        // initialize new firework
        int sparkCenter = random(0, 647);
     
        this->numberOfSparks = random16(this->minNumberSparks, this->maxNumberSparks);

        for (int j = 0; j < this->numberOfSparks; j++)
        {
            this->sparkPosition[j] = sparkCenter;
            this->sparkVelocity[j] = ((float)random16(0, 400)) / 20.0 - 10.0;
            this->sparkColor[j] = 255;
        }
        this->mainColorHue = random(0, 255);
       
        this->currentHue = 0;
        this->currentBrightness = 250;
        this->alive = true;
    }
    else
    {
        this->logD("spark alive");
        alive = false;
        // animate this firework
        for (int i = 0; i < this->numberOfSparks; i++)
        {

            this->logD("check spark position overrun");
            // make sure the next position doesn't overrun the LED array
            if (this->sparkPosition[i] > 647)
            {
                this->sparkPosition[i] = 0;
            }
            if (this->sparkPosition[i] < 0)
            {
                this->sparkPosition[i] = 647;
            }

            // add mirrors
            int sparkMirrorPosition1 = sparkPosition[i] + 161;
            int sparkMirrorPosition2 = sparkPosition[i] + 323;
            int sparkMirrorPosition3 = sparkPosition[i] + 484;

            if (sparkMirrorPosition1 > 647)
            {
                sparkMirrorPosition1 = sparkMirrorPosition1 - 647;
            }
            if (sparkMirrorPosition2 > 647)
            {
                sparkMirrorPosition2 = sparkMirrorPosition2 - 647;
            }
            if (sparkMirrorPosition3 > 647)
            {
                sparkMirrorPosition3 = sparkMirrorPosition3 - 647;
            }
            // Serial.println(String(this->sparkPosition[i]));

            this->logD("set spark color");
            // set the color of this LED spark
            if (sparkColor[i] > 0)
            {
                // don't change anything that's black. Only the things that are colored.
                // exernal code will need to "blank" the leds before each call to animate the firework
                this->logD("write color to LED");
                alive = true;
                leds[(int)this->sparkPosition[i]] = getColor(i);
                leds[sparkMirrorPosition1] = getColor(i);
                leds[sparkMirrorPosition2] = getColor(i);
                leds[sparkMirrorPosition3] = getColor(i);

            }

            this->logD("move spark position");

            // move the spark to the next position
            this->logD(String(i));
           
            this->sparkPosition[i] = this->sparkPosition[i] + this->sparkVelocity[i];

            this->logD("fade color");
            // fade the color
            this->sparkColor[i] *= this->fadeRate;
            if (this->sparkColor[i] < 0)
            {
                this->sparkColor[i] = 0;
            }
            this->logD("slow spark velocity");
            // slow the spark
            this->sparkVelocity[i] = this->sparkVelocity[i] * this->distanceResistance;
         
   
            this->logD("spark Velocity [" + String(i) + "]" + String(this->sparkVelocity[i]));
            this->logD("spark Color [" + String(i) + "]" + String(this->sparkColor[i]));
            this->logD("spark Position [" + String(i) + "]" + String(this->sparkPosition[i]));
            //delay(5);
        }
        this->logD("end of spark alive loop");
     
    }

   
    this->exploding = false;
}

CRGB firework::getColor(int index)
{
    float color = this->sparkColor[index];
 
    if (color > 0)
    {
        if (color > 128)
        {
            //Serial.println("WHITE");
            this->currentHue = 0;
            return CHSV(currentHue, 0, 255);
        }
       
        if (this->currentBrightness > 0)
        {

            if (this->currentHue < this->mainColorHue)
            {

                this->currentHue += 4;
            }

            if (this->currentHue >= this->mainColorHue && this->currentBrightness > 0)
            {
                this->currentBrightness -= .2;
                if (this->currentBrightness < 0)
                {
                    this->currentBrightness = 0;
                }
            }

            return CHSV(this->currentHue, 250, this->currentBrightness);
        }

        if (color <= .02 && this->currentBrightness == 0)
        {
            //Serial.println("OUT");
            sparkColor[index] = 0;
            sparkVelocity[index] = 0;
            return CRGB::Black;
        }
    }
    return CRGB::Black;
}

bool firework::isAlive()
{
    return this->alive;
}

bool firework::isExploding()
{
    return this->exploding;
}

void firework::logD(String thingToLog)
{
    if (PRINT_DEBUG)
    {
        Serial.println(thingToLog);
    }
}


There's a lot going on here, and if you read the rest of my blog you can see how I do this. In a nutshell, I'm implementing an abstract class, then I'm creating different "scenes" that use the methods in that abstract class. In that way, I can change the animation running in the Arduino while the Arduino is running. 

As always, Good Luck and Happy Coding!
~Tom


Comments

Popular posts from this blog

Using GIT with Arduino

Programming Arduino with Regular Expressions

Organize your Arduino code with header and class files